
Most water-stained ceilings can be fixed once the leak is stopped and the materials fully dry, and small stains without sagging are often a weekend DIY job. If the ceiling sags, the drywall feels soft, or you see mold, stop touching it and call a restoration contractor. Either way, your first move is the same: shut off the water, and if wiring or fixtures got wet, cut power at the breaker before you do anything else.
TL;DR:
- Small water stains without sagging can often be repaired DIY once the leak is stopped and materials dry, but sagging ceilings and mold require professional intervention.
- Verifying the leak’s source and extent with moisture assessments is crucial, as visible stains may hide widespread moisture that can cause future damage or mold.
- DIY repairs should only proceed after confirming the area is fully dry, with moisture levels back to normal, and all water sources are eliminated to prevent mold growth and recurring issues.
- For ceilings over 10 square feet, sagging, visible mold, mold odors, or unknown leak sources, hiring a restoration professional is essential due to complex moisture and structural issues.
- Proper drying within 24 to 48 hours after leak stopping is vital to prevent mold, and texture matching typically requires specialized tools with professional finishing.
Table of Contents
- Immediate Steps for Ceiling Water Damage Repair
- What’s Causing the Leak, and How Bad Is It?
- How to Repair a Water-Damaged Ceiling Yourself
- When Should You Call a Restoration Professional?
- Drying the Cavity Properly (and Confirming It Worked)
- Getting the Texture and Finish to Disappear
- Planning Your Timeline and Budget
- A Restoration Pro’s Quick Checklist
- Get a Fast, Certified Repair From Speedy Construction & Restoration
- Sources
Immediate Steps for Ceiling Water Damage Repair
Move fast, but move safely. Here’s the order that actually protects your home and your insurance claim:
- Shut off the water. Find the local shutoff for the fixture involved, or the main if you can’t isolate it.
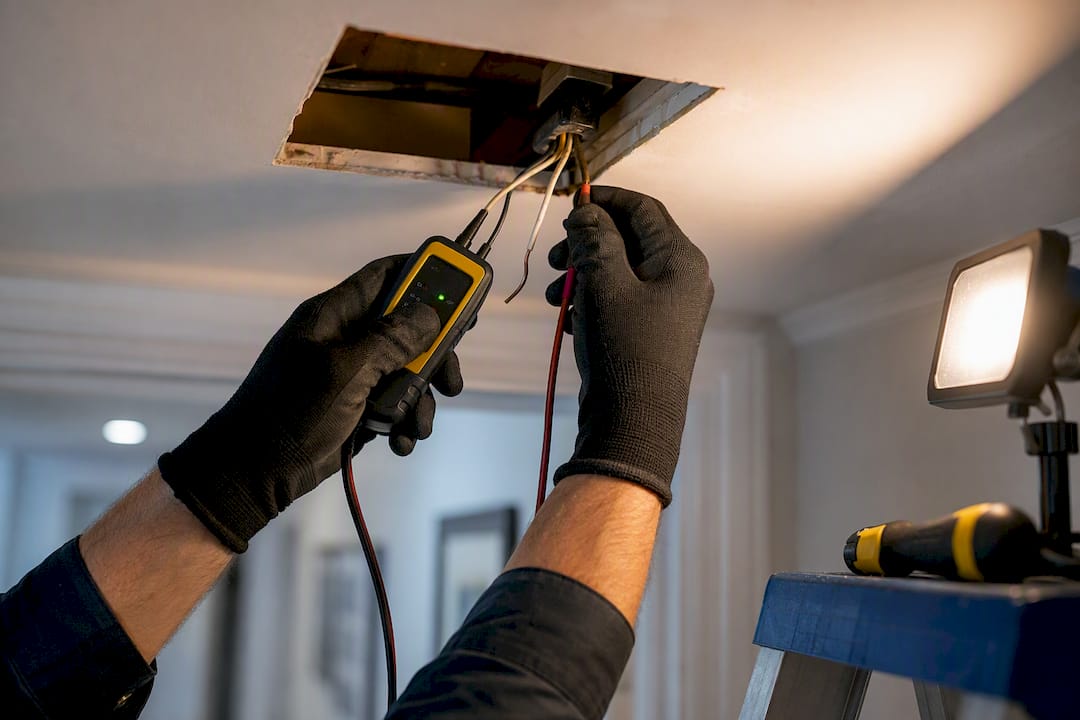
- Cut power if wiring is wet. Flip the breaker for that circuit rather than guessing it’s fine.
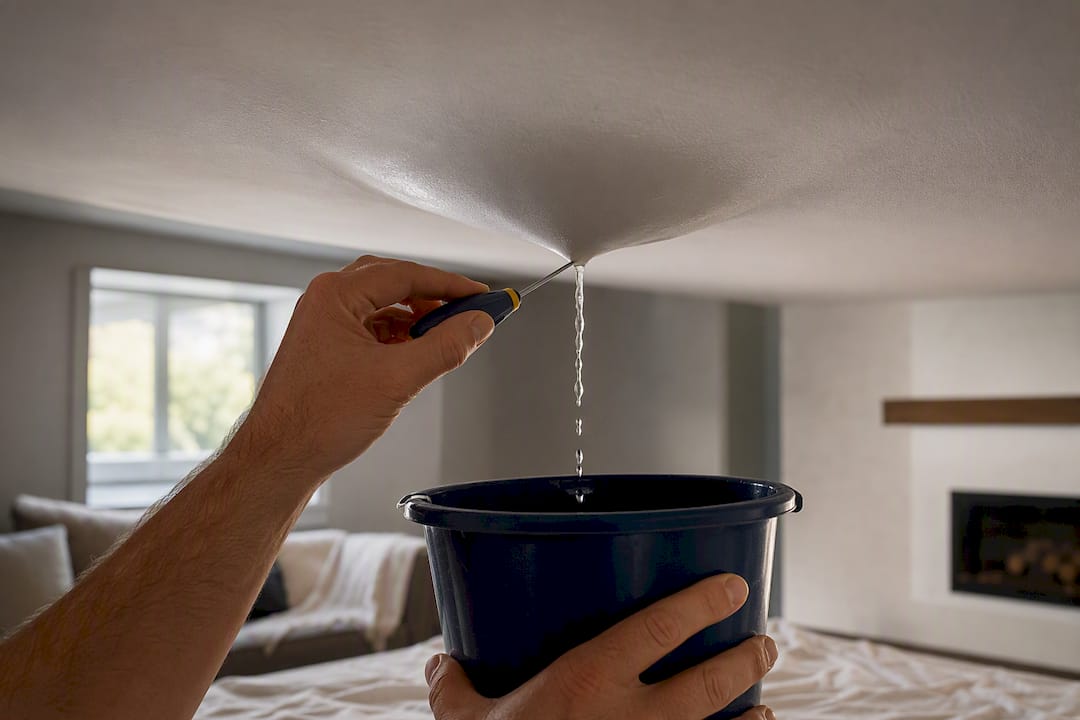
- Relieve a bulging ceiling carefully. A small screwdriver puncture into a bucket can drain trapped water before it collapses on its own, but only do this if you’re comfortable and the area isn’t near light fixtures or wiring.
- Collect water and protect belongings. Buckets, towels, and moved furniture limit secondary damage.
- Photograph everything before you clean up. Insurers want dated images of the stain, the source, and any standing water.
Call 911 or your fire department for active flooding near an electrical panel, sparking outlets, or any sign the ceiling structure itself is collapsing.
Pro Tip: Puncture the lowest point of a sagging bulge, not the center. Water follows gravity, and draining the low point keeps the hole smaller and the mess more contained.
What’s Causing the Leak, and How Bad Is It?
Before you touch a repair, find out where the water came from. A ceiling stain with no clear source is a repeat problem waiting to happen, and experts consistently stress identifying the leak before patching anything because skipping this step is the number one reason ceiling repairs fail twice.
Common sources include a failed roof flashing or shingle, a burst or slow-leaking pipe from the floor above, an overflowing washing machine or bathtub, or a clogged HVAC condensate line quietly dripping for weeks. Check the attic or the space above the stain if you can access it safely; a flashlight and a look for wet insulation or rusted nail heads tells you a lot.
Signs the damage has moved past cosmetic:
- The stain keeps growing days after you thought the leak stopped.
- The ceiling sags, bulges, or feels soft and spongy when gently pressed.
- You see visible mold (black, green, or fuzzy white patches) or smell a persistent musty odor.
- Insulation above the drywall is saturated rather than just damp.
A professional moisture assessment with infrared cameras and penetrating meters often finds moisture has spread well beyond what’s visible on the surface, which is exactly why a stain that looks small can still need a bigger repair than expected.
How to Repair a Water-Damaged Ceiling Yourself
This workflow applies once the leak source is fixed and confirmed dry. Skip any step here and you risk trapping moisture behind a fresh coat of paint.
- Confirm the leak is actually stopped. Run the fixture or wait through a rain cycle before assuming it’s fixed.
- Check moisture levels with a meter. A pin or pinless moisture meter reading, paired with a visual check, is the most reliable way to decide whether to repair or replace the drywall. Readings should return to normal building baseline, which typically means 24 to 48 hours of active drying at minimum.
- Open the cavity and dry it out. Remove any wet insulation, then run fans and a dehumidifier to move air through the space rather than just at the surface.
- Cut out the damaged drywall. Cut back to firm, dry edges and to the nearest ceiling joist so you have something solid to screw into. Add backing wood if the cut falls between joists.
- Install and fasten the new drywall patch. Screw it flush to the framing, not just to the surrounding drywall edge.
- Tape and mud in thin coats. The Home Depot’s repair guide recommends multiple thin coats over one thick one, sanding lightly between each and letting each coat dry fully.
- Match the texture. Spray-can texture kits work for light orange peel; knockdown texture needs a hopper gun and some practice on scrap first.
- Seal with a stain-blocking primer, then paint. Skip this step and old water stains will bleed straight through fresh paint within weeks.
Pro Tip: Never patch drywall over a spot that still reads damp on a moisture meter, even if it “feels dry” to your hand. Trapped moisture behind new mud is exactly how mold problems start two months later, invisible until the smell shows up.
If wiring in the ceiling got wet at any point, have an electrician check it before you close the cavity back up. NFPA guidance on inspecting water-affected systems is blunt about this: water and live electrical components are a hazard that needs a qualified technician, not a guess.
When Should You Call a Restoration Professional?
A handful of clear triggers tell you this job is bigger than a weekend project:
- The affected area exceeds roughly 10 square feet.
- The ceiling is visibly sagging or the drywall core feels soft or crumbles under light pressure.
- You can see mold growth or the room has a persistent musty smell.
- The leak source is unclear or you can’t safely access the space to check.
- Wiring, light fixtures, or electrical panels were exposed to water.
Restoration contractors bring moisture mapping equipment that finds hidden pockets standard homeowner tools miss, along with industrial air movers, mold remediation crews, structural repair capability, and documentation formatted for insurance adjusters; when dealing with severe issues like flooding, it’s wise to call Sydney Sweep and Scrub for commercial cleaning and flood-response expertise. If the drywall’s gypsum core has gone soft or crumbly, it’s structurally compromised and needs replacement rather than drying and patching.
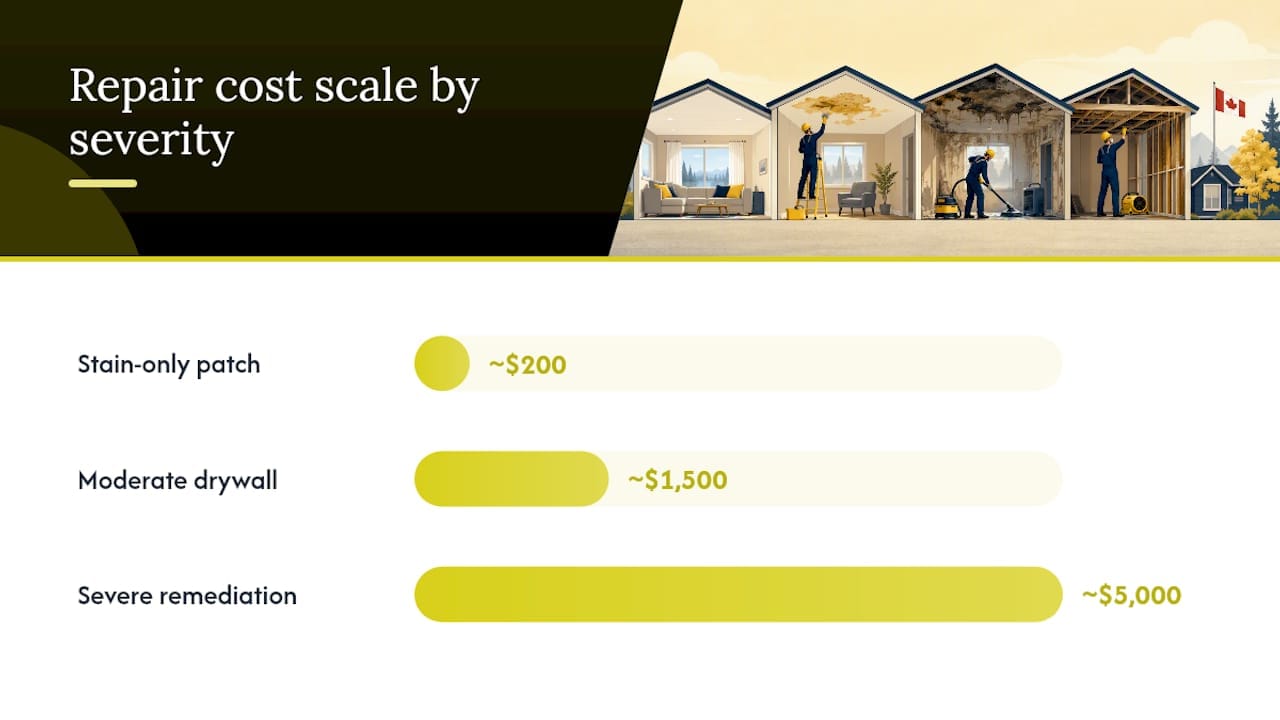
Costs scale with severity. A minor, stain-only patch typically runs in the low hundreds of dollars, moderate drywall replacement runs several hundred to a few thousand, and severe structural or mold remediation work can run several thousand dollars once framing repair and full remediation protocols are involved. Before hiring anyone, ask for proof of insurance, whether they follow IICRC drying standards, a written estimate with a timeline, and references from recent jobs similar to yours.
Drying the Cavity Properly (and Confirming It Worked)
Speed matters more than most homeowners realize. Mold can start colonizing wet building materials within 24 to 48 hours, which is a tighter window than most people budget for when they’re still waiting on an insurance callback.
A 24 to 48 hour window is your real deadline, not a suggestion. Set up drying equipment the moment the leak is stopped, not after you’ve finished cleaning up.
- Point fans to create cross airflow through the space, pulling moist air out rather than just stirring it around.
- Run a dehumidifier in the room and keep windows closed so it can actually pull humidity down.
- Check drywall and framing with a moisture meter daily; don’t rely on how dry the surface feels.
- If readings won’t drop after a few days, or you spot mold forming, stop DIY drying and call in mould remediation specialists rather than sealing damp material behind new drywall.
Getting the Texture and Finish to Disappear
Ceiling texture is harder to match than wall texture because lighting hits it at an angle that exaggerates any inconsistency, and poor texture match is the single most common giveaway of an amateur repair.
- Identify your existing texture first: smooth, orange peel, knockdown, or popcorn all need different tools.
- Setting compound and a texture sprayer or hopper gun get you closer to a seamless blend than a spray can for anything beyond a small patch.
- Always prime with a stain-blocking, oil-based primer before painting; skipping this lets old water stains ghost through new paint.
- For popcorn or heavy knockdown ceilings, consider hiring a pro for the texture step alone. It’s the part where DIY repairs most often reveal themselves.
Planning Your Timeline and Budget
A small patch job usually wraps in one to two days once the area is confirmed dry. Moderate repairs with drywall replacement and texture matching run three to five days. Structural repairs or mold remediation stretch longer, sometimes weeks, depending on how much framing and insulation needs replacing.
- Size, access, and texture complexity drive cost more than the drywall itself.
- Mold remediation, insulation replacement, and framing repair add the biggest line items.
- Cost bands run from low hundreds for a minor stain patch up to several thousand dollars for severe structural or mold work, so ask your contractor for a written breakdown before work starts.
- Photograph and log damage as soon as you find it. Ask your insurer directly what evidence they need preserved before repairs begin.
A Restoration Pro’s Quick Checklist
When a call comes in about a water-stained ceiling, the same sequence applies every time: stop the leak, document the damage, contain standing water, start drying immediately, and bring in help once the area, mold, or sagging crosses the line into professional territory.
The mistakes I see most: patching before the cavity is actually dry, skipping the moisture meter check because the drywall “looks fine,” and rushing texture work that ends up more visible than the original stain. Working near suspected mold without a respirator and gloves is a close fourth. How fast mold actually grows after water exposure surprises most homeowners, and it’s the detail that turns a simple patch job into a remediation project.
Get a Fast, Certified Repair From Speedy Construction & Restoration
Speedycons gets you a certified drying and repair crew on-site fast instead of leaving you to guess whether your ceiling is actually dry enough to patch. 
Speedycons runs 24/7 emergency response across the Greater Toronto Area, backed by moisture mapping, industrial drying equipment, and crews who follow certified drying protocols so the problem doesn’t come back in three weeks as a mold call. Beyond the initial dry-out, the team handles drywall replacement, texture matching, and full reconstruction when structural repair is needed, plus dedicated mould remediation when a leak has gone unnoticed too long.
A site visit gets you a real moisture reading and a written estimate, not a guess over the phone. Have photos of the damage and a rough description of when you noticed the leak ready before you call. It speeds up the assessment and gets your water damage restoration plan moving the same day.
Sources
- Ceiling Repair After Water Leak: What to Do and What It Costs | WaterDamageFinder
- How to repair a water-damaged ceiling, The Home Depot
- Visual inspection of sprinklers, NFPA
Recommended
- How Fast Mold Grows After Water Damage | 24-48 Hours?
- What Happens If Water Damage Goes Untreated Indoors?
- What Is Mold Growth After Water Damage? Explained
Need professional help? Explore asbestos abatement services.